Day Ten: Braided Pullover

And so ends, happily, the Adventure of the Wandering Braid.

Pattern: Braided Pullover

Sweater Yarn: Filatura di Crosa Zara Plus, 774m, No.1706; 100% superwash wool. An aran weight yarn, knitted firmly in worsted weight. Blocking smoothed out the tension of knitting, and gave it a velvety, smooth drape.

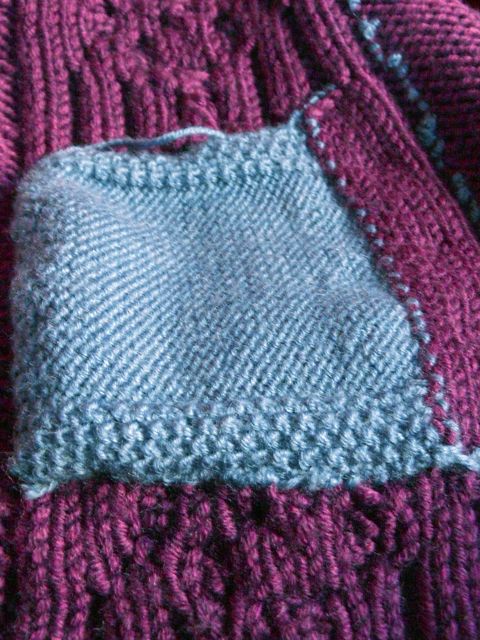
Pocket Lining Yarn: Filatura di Crosa Zarina, tiny amount, No.1481.

Needles: 4mm for body ribbing; 4.5mm for body, and for sleeve ribbing; 5mm for sleeve; 3mm for pocket lining. The reasons for my peculiar needle choice explained here… sadly, it did not work as intended, and I had to buy another skein.

Final Thoughts:
Although this took more than 10 days, I’m consoling myself with the fact it took, actually, 10 knitting days.

I’m pretty happy with the result, although I might pick up and lengthen the sleeve cuffs later. The braid lies exactly as I wanted it to: a trompe l’oeil  of a wrap top. I’m really happy that I decided to do the chest section of the braid separately – otherwise, the sharp change in angle combined with bush shaping was creating horrid bumps and warping.

I decided to restrict the pocket size to the width of the braid (which gets stretched slightly when worn), so as not to have any puckering in the stockinette section – over the tummy, no less! – where I sewed it down.

The pocket is held closed with light- weight plastic snaps; I added these pretty buttons along the braid to continue the illusion of its being a wrap top.

I’m happy with the back shaping too! It makes all that calculating and measuring worthwhile.

Overall, I think it’s a good looking and mostly practical pullover. I wish the sleeves were longer because when I face winter, I face 10 deg C without heating, and have to rely on my mammalian evolutionary ancestry to keep warm. But then again, I wouldn’t be facing winter without the defence of a long sleeved layer inside, so perhaps this pullover can stay bracelet length.

The most impractical yet beloved component of my sweater is the tiny pocket – what on earth can I keep in it??! A microfilm with the plans of the new submarine?? Do spies even use microfilm nowadays, or have I been reading too many Agatha Christies? Never mind, it’ll hold a scrap of tissue paper if I get a runny nose.

Day Nine: Finish Line in Sight

Yikes! Has it really been a week since my last post? Sadly, my knitting time got sucked into a Real Life black hole.

But look at what’s emerged from the other side:

  • Complete and blocked body (except for half a neckband).
  • Complete and blocked sleeve.
  • A second sleeve that has just finished being blocked.

Does this look awfully like the last post? Don’t forget, the this is what the black hole did to the sleeve:

Sadly, the black hole also ate some yarn so I will have to buy another skein to complete the neckband. But now, the finish is near!

Day Eight: Will I or Won’t I?

… finish this in 10 days? I think probably not, but I’m ok with that because there was a lot of Other Stuff going on. I’m patting myself on the back kindly, and reminding myself that the point was to get a quick FO, with bouncy, springy wool, instead of working on endless, fingering weight cotton tops. And so, a sweater in 11 or even 12 days is definitely better than a top in 4 four months, right?!

At this point, the body is all done; only the floating bit of cable remains to be sewed down. I’ll wait till after blocking to do that, to allow everything to expand and settle in place. One sleeve is almost done… I had some more ripping last night because I ignored my own rules of ease and made a very tight underarm.

This is the most panic inducing stage for a new knitter – all pieces will look HUGE! Armscyes will dangle halfway to the waist, side seams will reach tunic length. Then the stabilizing magic of seams will whoosh everything into place: first, the sleeves will become human (and not gorilla) size; then the side seams will scuttle into their proper length; once the sleeves are sewn in, the sides will zoom into their proper positions on the torso; finally, after the front bands / collar are applied, all will be well.

What is still annoying me is that I might run out of yarn, perhaps by half a skein.

And just as I wrote that, I thought, wait a sec, I’ve made a sweater with exactly the same yarn before, and I had a bit left over! Did I make that at a looser gauge?

Yes! I used 5mm needles. And no, I don’t need to make another gauge swatch – I’ve got all the calculations written down from the Farmer’s Market Cardigan.

So my sleeves will end up being slightly looser gauge than the body, but that’s all right. I made the body at worsted gauge for an aran yarn, so a mildly looser gauge won’t make a big difference to the look of the sweater.

And that’ll definitely push it to beyond 10 days.

Day Seven: Body, Sleeve, Un-Sleeve, Sleeve

the interests of keeping it honest and real, here’s where I was a few hours ago:

  • Fronts – done except for the braid descending the other side.
  • Back – done.
  • Shoulders – shaped and done.
  • Sleeve – started…

I had thought of working a top down sleeve but the moment it reached biceps level, I knew there was a problem. It was massive, nearly 30% larger than it needed to be.

Here’s why: a top down sleeve is worked with short rows. While working short rows – anywhere – the total number of stitches remains the same; only some stitches  are worked more than others to create a bulge in the fabric. So when working a top down sleeve, the total number of stitches to be picked up around the armhole should be the number they need to be at the biceps level. And for me, to pick up that number would mean skipping so many stitches in the pick up row that there would be sloppy gaps around the armscye.

Of course, I could have picked up enough stitches to not have any gaps, and then worked decreases while shaping the arm cap with short rows. The decreases would have brought the stitch count down to what it needed to be at biceps level. I could have done all that, but to tell the truth, I just didn’t want to. I was working the sleeve cap using Magic Loop, and I H.A.T.E. ML. I absolutely detest the way it breaks the rhythm of knitting, to forever slide needle points in and out!

So I ripped out the arm cap, and started working it from the bottom up, as a regular, sewn in sleeve.

Pictures tomorrow!

Day Six: Left Front

I’m so relieved that the most complicated front is done!

As you can see, I held the cable braid on a separate needle in front; behind it,  CO enough stitches to cover its width; and then continued knitting with the rest of the body stitches.

When it was time to split for the neck, I decided how much I wanted to shift the cable panel, and moved the neckline BO accordingly. That is, I bound of the same number I had cast on for behind the cable, but off centre.

Next, with new yarn, I worked the cable panel, shaping the diagonal slope with short rows.

See how they’re positioned? At the beginning and end of each pattern repeat there’s a section of simple 2×2 rib, so I tried to keep the short rows in those areas as far as possible.

After the braid had shifted – a giant cable cross worked with the entire braid, as it were – I started knitting the braid with the left front, with the usual neckline and  underarm shaping decreases in the stockinette sections.

Once the body is complete, I’ll sew down the floating section of the braid to make it all lie perfectly flat.

And see how I got my camera to capture the exact, accurate, real, deep purple of this yarn? I have no idea how that happened. None at all

Day Five: Some Ripping…

Remember at the planning stage I’d decided to keep the braid almost vertical to the neck and then slope it sharply across the front to make it look like a wrapped top?

The first part was easy: I moved the braid one stitch every 6th row. But the sharp slope came out looking horrible:

I was moving it by two stitches every row, and the line of decreases on one side and increases on the other looked dreadful! So I ripped it out. And pondered on how to solve the problem.

Finally, I held the cable stitches on a spare needle, CO stitches equal to its width behind it, and finished the front in plain stockinette. So much easier to add bust shaping short rows and increases without having to contend with the massive fabric warping caused by trying to move the cable as well!

Once the front is shaped and split for the neck, I’ll work the cable separately, adding short rows to shape the slope, and then start working it together with the left front. The bit of cable that floats over the stockinette under it will be sewed down. If all this sounds utterly complicated, I should have pictures by tomorrow.

Meanwhile, here’s how I added faux seams at the sides, for structure.

Unravel a single stitch from the middle of the underarm…

… all the way down to the ribbing.

Then hook it back up. Now, if you were to hook up each stitch again, that would just be re-doing that column as it was, making the whole exercise pointless; what you need to do is hook two stitches, then one, alternately.

The resulting column (can you see it? It’s the one beginning at the bottom right corner of the picture) blends in pretty well with the rest of the fabric, but forms a good crisp line for folding and blocking. Besides giving the structure of a seam, without having to actually sew. This splendid (and fun!) method is from Knitting Without Tears.

Also, apologies for the blurry pictures! I’m still trying to coax my camera into taking good photographs of anything with red. I’m relieved to know I’m not the only one with this problem! I found this interesting blog post explaining the phenomenon.

Day Two: Pockets!

Or at least, one pocket.

At this time, I’m keeping track of front shaping, back shaping (at different rates) and the increases and decreases which shape the slight diagonal slant of the braid. I usually shape my fronts and backs differently: fronts slope at an even rate to the waist, backs slope sharply for 3 inches, then gradually the rest of the way to the waist. This takes away that awkward flap of fabric above the butt.

Since the pocket will lie behind the braid, I split the work along the side of the braid, and am knitting back and forth to create the pocket opening.

I’m also leaving out the side ribbing since I am shaping with decreases instead of relying on clinginess.

Tips for this Stage: 

  • One great tip I read somewhere was to use contrast yarn to keep track of shaping. Just flip it from the RS to WS and then WS to RS, alternately, every time you make an increase or decrease.
  • Position all decreases such that  single columns of stitches move towards the centre of the garment, ‘eating’ stitches.