Boticelli Tunic

There she goes!

 small boticelli 2

I’m happy with the result, but please, no more fingering weight tunics for a long time.

I’ve documented our long journey together since January: my desire for a striking, lightweight woolen dress; shaping and design elements.

At our journey’s end, a quick summary: tunic length dress; inseam pockets edged with herringbone stitch and i-cord; wide, square neck edged with i-cord; herringbone stitch collar, shaped around the neck with short rows; sleeves picked up from the armscyes and knitted down, ending with a strip of herringbone stitch bordered with welts (to mimic i-cords in horizontal knitting).

There are lots of polished touches I love about this: the i-cord borders, the way the skirt shaping automatically forces the pocket edges to swing out diagonally, the faux seams along the sides.

small boticelli 3

I love the yarn and colour as well, and can’t imagine anything so sacrilegious as using Malabrigo Sock to actually make socks! It is soft and strong, but has an unexpected matt denseness. On the body it feels woolly, but also velvety. Slightly more variegation than I liked, but I can live with that!

Now for the Earth to swing back around the sun, so I can actually wear it!

Details
Pattern: my own, generated with CustomFit; the border pattern is from Herringbone Socks.
Yarn: Malabrigo sock; 100% wool; 402m (440 yds) = 100gm; light fingering weight; 4 skeins in “Boticelli Red”. Just scraps remained at the end.
Needles: 3.0 mm circulars for everything.

Boticelli Details

I finished a marathon session on the Boticelli Tunic recently, determined to reach a significant goalpost – finishing the body. And now, ‘tis so!

I’m going to start the collar and sleeves soon. Meanwhile, here are some details:

Using CustomFit for a Square Neck
CustomFit currently does not have a square neck option, so I started with a scoop neck, the same depth as armscyes. To shape the scoop neck, the generated pattern instructed me to bind off most of the stitches in one row, then a few remaining stitches gradually on each side to shape the rounded edges of the neck.

small neck detail

To make a square neck, the solution was obvious – I would have to bind off all the stitches in a single row and then work the sides of the neck as straight vertical edges. However, there was a small wrinkle (hah!) in the calculations, caused by bust shaping – I had more stitches in front than at the same level of the bodice at the back. And I knew that CustomFit would have dealt with those extra stitches by decreasing them during the scooped neckline shaping, to ensure that the front and back shoulders ended up with the same number of stitches. How, then, was I to know which stitches were being decreased (in my generated pattern) to shape the neck, and which to reduce the extra bust stitches? Here’s how:

No of Back bodice sts at armhole BO row = B
No of Front bodice sts at armhole BO row = F
Ie, total number of extra bust sts on Front Bodice = F-B = E

Initial BO on generated scoop neck pattern = X
Shaping decreases on generated scoop neck pattern = Y
Ie, total sts removed during scoop neck shaping = X+Y = Z

But out of these Z sts, E sts are the extra front bust sts.
So these E sts can be decreased in the row below the square neck BO. The remaining Z-E sts can be BO straight across in the next row.

As knitting instructions this works out as:
On front bodice work up to 2 rows below armscye row.
Decrese E sts along the middle (with my stitch count, it worked out to [k2, k2tog] across the middle)
Work next row straight
BO armscye sts, knit left front sts, BO Z-E sts in the middle of the piece, work to end.
Continue with armscye shaping on each side, keeping neck edge straight. Shape shoulder same as back bodice.

Pocket Construction
I used my method detailed here, worked in the round. The edges of the pockets are worked in a strip of pattern from the Herringbone Socks, bordered by double knit tubes.

smaill pocket detail

I continued with increases every 4th row to shape the flare of the skirt… and these increases also made the pocket edges swing out  diagonally. Just what I wanted!

small pocket incs

Note that you’ll have to make the same increases on the pocket lining pieces too, to make sure they stay in phase with the skirt shaping.

small pocket back

I feel I’ve been working on this forever. From early January, in fact! But of course there have been lots of breaks, including little bites of something large and chunky to recover from hundreds of stitches in light fingering weight yarn on 3mm needles…

small 03

Rosamund’s Sweater

At last! My errant 13th of 2013. It travelled with me, one-armed, for three months until I sat down and finished the arm in 3 days.

small front

I had envisioned Rosamund’s Cardigan as a big woolly thing, dramatic collar and sweeping curved edges. The twisted reversible cable rib is so delicious… doesn’t it look like piped icing?

small-Piping

I wanted it snuggled against my neck and cosily embracing my wrists.

small-cuff

And of course a big woolly cardigan needs pockets, especially ones edged with a toned down echo of the neck and cuff swirls.

small-pockets

The construction was easy: a top down raglan. I made inseam vertical pockets and just eyed the front curve, decreasing where I felt I should. The cables were worked along with the curved edges until the curve became almost horizontal; at that point, I held the cable stitches separately and finished the stockinette section (after casting on a stich at each edge to use in seaming). Then I added a similar seam stitch on the inner edges of the cable strips and worked them separately, throwing in short rows to force them to curve. (See how there’s no seam when the cables are vertical – right side of pic – and then the seam starts when the cables become horizontal on the left side of the pic?)

small-curve

All done by eye, no great maths involved. Where the strips met I grafted them together (see here for techniques on grafting ribbing; I bound off one side and grafted live stitches to the edge), and then sewed them to the cardigan body using up seam stitches previously created.

 small-graft

Apart from that, I did my usual bust and waist shaping and made it longer than specified. One thing though: I’d added some short rows to raise the back neck, but they turned out to be unnecessary. In fact, they were bunching up so much that I snipped them in the middle, unravelled the short rows, and grafted the live stitches together again for a smooth nape.

As some people may notice, I put the buttonholes on the wrong side. That is, the short front overlaps the longer one instead of vice versa. I realized my mistake after I’d finished most the yoke, but couldn’t be bothered to rip out and start over.

Invisible CO and BO for all edges! See how the ribbing magically flows from WS to RS without a hard edge anywhere!

 small-tubular

Details

Pattern: Rosamund’s Cardigan, Interweave Knits Fall 2009
Yarn: Cascade 220; 100% wool; 201m= 100g; “Blue Sky Heather”; used up almost all of 6 skeins since the ribbed cable eats a lot of yarn.
Needles: 4mm for everything.
Mods: longer, rounded edges, pockets, long sleeves, tubular CO and BO for ribbed edges, more shaping.

small buttoned

13-ish in ’13

13 in ’13! And 11 of them new projects started in this year, with only two of them WIPs carried over from last year! And this is without going on a knitting hyperdrive or taking leave from work to knit. In fact, I had fewer holidays than last year, and sometimes weeks went by without picking up the needles. 13 Sweaters made through after-work knitting, a couple of hours on weekend days.

Collage 1

Collage 2

Collage 3

Top: Nanook, Annis Shrug, Delysia
Second:    Ginger Lizette, Cranberry NectarTiger Whisperer
Third:   Aidez Beatnik Hoodie,  George St Pullover
Fourth: Charcoal DahliaKouklaAdriatic
Last: Rosamund’s Cardigan

So I thought about how I managed to do it. Were there Significant Life Lessons here? You decide, dear readers.

Decide to do it. I’ve made similar decisions in the past, but this time it worked. Perhaps I kept the decision at the top of my mind more often?

Be inspired. Before knowing about the knitting explosion on the internet, I would have thought churning out one sweater per year a pretty good goal. Seeing other, regular, people churn out sweaters every week or ten days sets the bar higher. Your brain starts seeing it as something possible, desirable and even doable. Once your brain accepts that a goal requires no special skill or perfect timing to get something done, it just goes ahead and does it.

Don’t compare. On the other hand, seeing people churn out a new sweater a week can be a source of despair! I was careful not to compare my own pace with any other person’s. Whatever worked was fine for me.

The two preceding paragraphs sound contradictory; a delicate balance is required. Turn off comparisons if they drain you, and only look to others as long as it serves as a healthy sort of inspiration. I would start checking other people’s completed sweaters on Ravelry only when I finished one of my own, or to top up flagging levels of my sweater greed, just for the feeling of belonging to an achievers’ club.

Pick your own pace. This was really important to me. I used to belong to a group on Ravelry which aimed to do a project, any project, each month. Although it was great fun and the organizers really put a lot of effort into the theme, after a while I started feeling a great sense of dissatisfaction and stress, because it didn’t mesh with my style of knitting. I like making large stuff, and it really annoyed me to make tiddly little things just to finish them within a month. Also, having to wait till the start of the next month, grrrrr!

So then I joined the IntSweMoDo group which was perfect! Aim to make one sweater a month at your own pace, starting and ending whenever. Sweaters, not egg cozies! Complete freedom of starting and ending time! Lavish praise when a sweater was finished! Perfect!

This freedom was particularly important to me because knitting very much occupies a ‘Do Whatever I Want’ space in my mind, as opposed to work where we are subjected to the tugs of what feels like millions of factions. I enjoy my work, which is a cause dear to my heart and has us conduct large, international, activities. But it also involves coordination with governments, donors, partners; requires constant checking to make sure everybody is mostly satisfied and nobody is offended; and is the sort of work which by definition can never come to a definite end. On good days it feels intricate and exhilarating, with a finger on the pulse of the world. On bad days it is wretchedly exhausting. So, monthly knitting goals would just be… NO. A loose and non-enforceable goal of 13 in 13, if I wanted to, was perfect.

Set things up to be easy. My multi-project harem system really worked. The most tedious tasks of any project are swatching, calculating, casting on. Decisions take time. So I would finish all the tedious work for a batch of projects in one go, and just enjoy soothing knitting for the next few months. This really helped with after-work knitting when brains were just too fried to think about anything.

Remember. In all this, I remind myself that knitting is something I want to do and can stop any time 🙂

So… you’ll notice I said 13-ish in ’13, and that’s because the last project is still incomplete (and I may only get 95% done by the end of the year). But WordPress reminded me this is my 100th post, so I wanted it to be Significant in some way.

Next year… I’ll start on the smaller stuff. I love making sweaters, but I do need cowls and hats and gloves, and have a few good patterns languishing in my queue for years. Perhaps 14 in 14 may work, mostly knitting small stuff?  This is dangerous ground; the secret of success is to know the value of restraint.

In-seam Vertical Pockets

Right, let’s do a quick tutorial on adding inseam pockets to your knitting.

pocketside

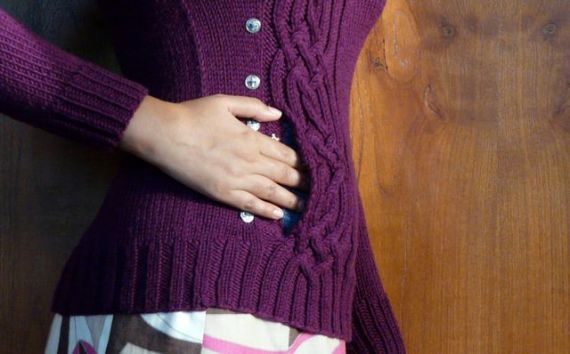
I love adding pockets to all my knits because really, what’s the point of a cozy cardigan which leaves your hands cold? One of the greatest joys of being snuggly warm is to push your hands into pockets and a sad majority of patterns deprive us of that joy. However, pockets are really easy to add! Patch pockets, obviously, would be the easiest, but vertical inseam ones aren’t difficult at all. Remember, in knitting, we create the fabric, and can manipulate that creation in any direction we see fit.

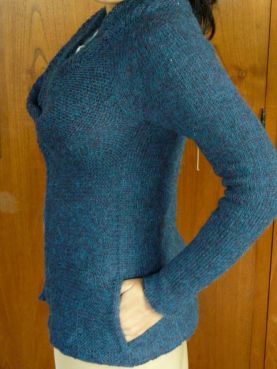
Let’s start! I’ll be talking about creating generic pockets, and noting differences for specific cases. The finished pockets are from two previous sweaters while the instructions are from a WIP. Since these were taken in real time, some of them required manipulation to negate effects of evening lighting… in other words, they are washed out.

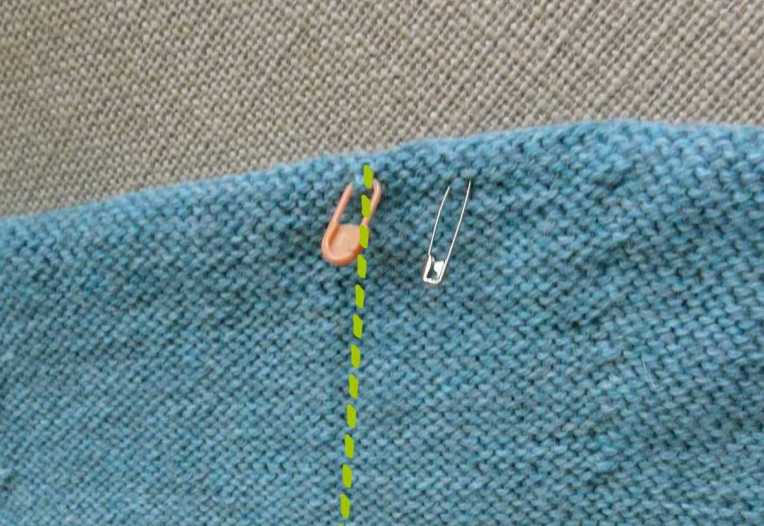
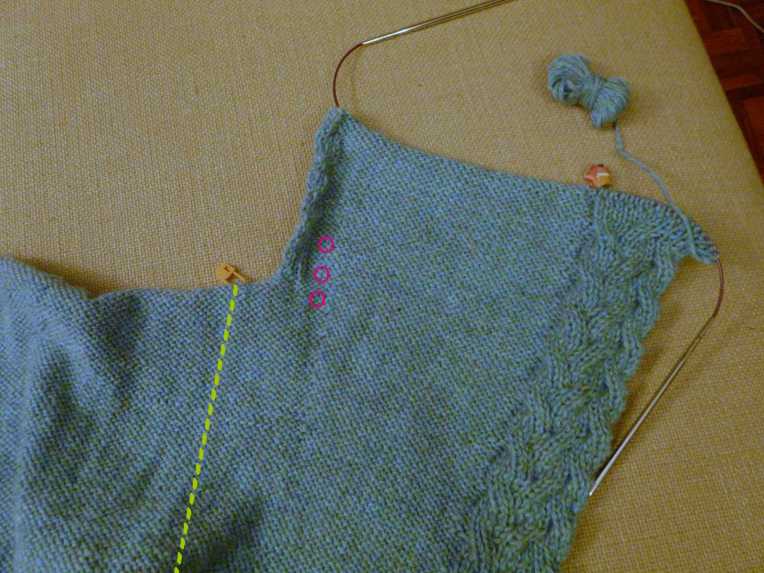
1. First, orient yourself. I’m knitting this cardigan top-down, so when it is laid on the floor with the live stitches furthest away from me, the neck of the cardigan is nearest my feet. The dashed lines divide the cardigan into three sections: to the right of the green line is the Left Front (LF), as worn; to the left of the red line is the Right Front (RF) as worn; between the two lines is the Back. If you were working the cardigan bottom up, the RF would be to your right and LF to the left when laid on the floor. Remember that difference, and you can use this tutorial for bottom-up cardigans as well.

01 Orientation

2. Work up to the row where you want the pocket openings to begin. End on a WS row. You are now about to start a RS row, with the yarn to the extreme right of the work. Important: my cardigan has reverse stocking stitch on the RS, so keep that in mind when you look at these pictures.

3. Mark the LF pocket opening. The orange marker is at the side ‘seam’. I like to orient pocket openings slightly forward (so that my elbows are not skewed out when shoving hands into pockets). The metal safety pin marks the pocket opening column, about an inch towards the front from the ‘seam’ column.

02 Markers

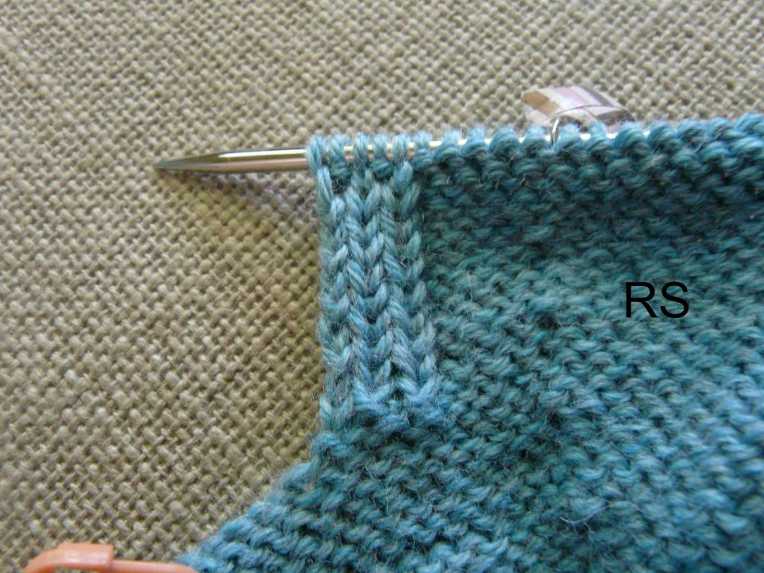
4. Work up to 3 sts before the pocket opening marker (metal safety pin). On the next three sts, kfb into each stitch. Why? We want to create a stable edge for the vertical opening, and stockinette would curl. So we are going to create a 1×1 rib on the last 6 stitches, where the purls will recede completely to make the edge look like regular stockinette. To avoid scrunching the fabric, we add 3 sts along the opening via the kfb’s. So the last 6 stitches (3 original stitches, 3 just created with kfb’s) will form the 1×1 rib edge.

5. From this point on, work only the LF. Along the pocket opening edge, work the last 6 sts in 1×1 rib. Don’t forget any shaping and patterning required along the LF!

On the stockinette side your ribbing will look like uncurling stockinette:

03 Edge

On the reverse stockinette side the ribbing will look like three columns of uncurling stockinette:

04 Edge RS

Usually, the stockinette is the RS so you would continue in this way, creating a pocket opening edge which blends in beautifully with the rest of the fabric. However, since my RS is reverse stockinette and the knit stitches of the ribbing will be visible, I’m adding a cable twist to them to match the front-bands.

6. Work as established till the pocket opening is as long as you want it, minus two rows, ending with a WS row. Count the number of rows you have worked so far (X). On the next row, work to last six stitches, then work two stitches together three times. If stockinette were your right side, you would k2tog x 3. Since reverse stockinette is my right side, I did p2tog x 3. Your stitch count along the pocket opening is now back to what it was originally.

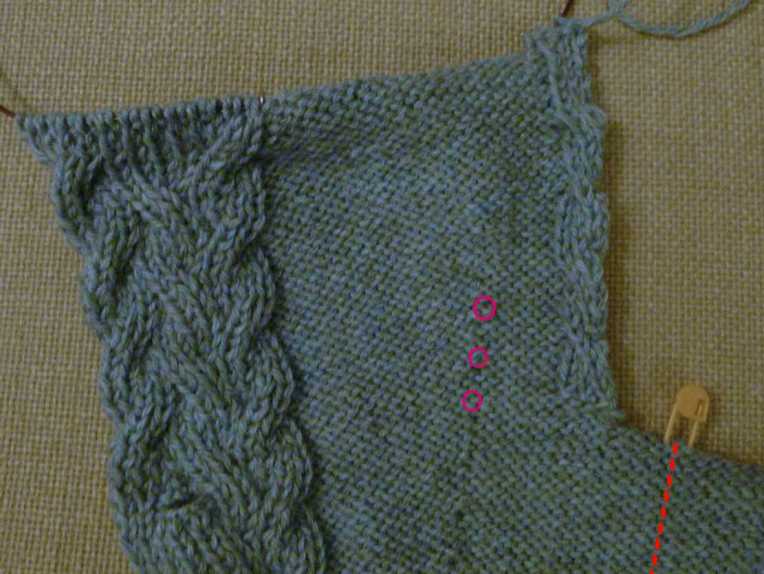
7. Work a WS row. When you orient the cardigan as in the first picture, the LF is longer than the other two sections and the yarn is once again at the extreme right of the work. Pink circles show the continuing hip shaping on the LF piece. Do not cut the yarn.

05 Pocket Front

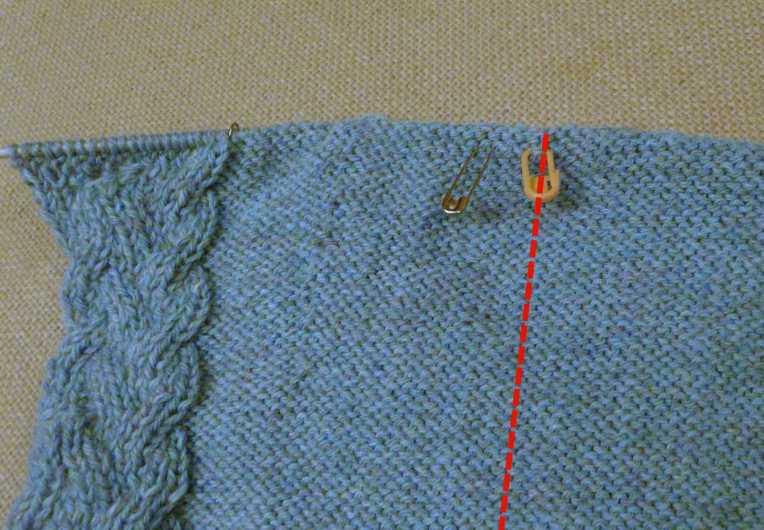
8. Now do the same on the other side. Mark the side ‘seam’ and the actual pocket opening an inch towards the front. The orange marker is at the ‘seam’ and the metal safety pin is at the pocket opening column. Place the RF stitches on a new working needle, with its tip at the pocket opening.

06 Next Markers


9. With a new yarn end, start at the pocket opening. Kfb into 3 stitches at the opening, then work the rest of the RF.

10. Continue as before, working the 6 edge stitches in 1×1 rib and doing all shaping and patterning required on the rest of the piece till X rows have been worked, ending with a WS.

11. On the next row, work two together three times as before to decrease the extra stitches at pocket opening edge. Work one more row, ending with the yarn to the right of the RF section. Cut the yarn.

07 Next Pocket Front


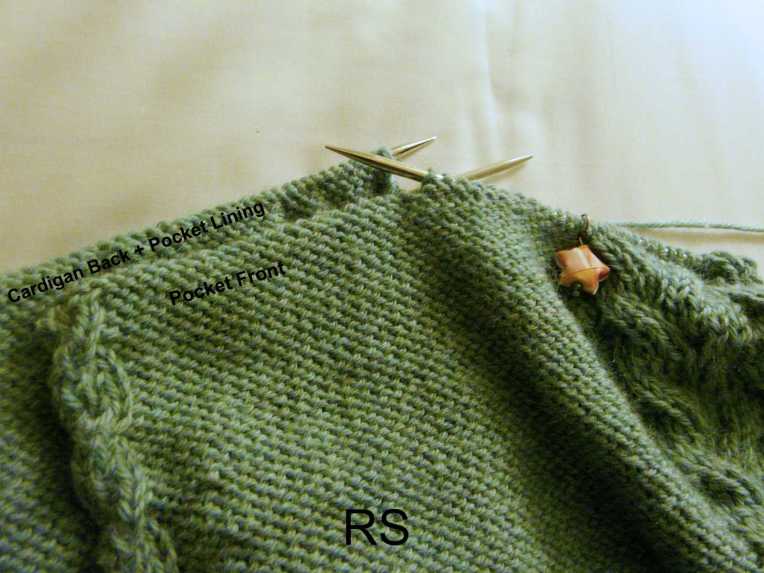
12. Now we will work the back section and pocket linings at the same time. The generic instructions would be: with a new yarn end, pick up stitches for the lining from the WS, work across the Back, pick up stitches for the other pocket lining. But let’s look at these instructions in a little more detail.

a) Pick up stitches

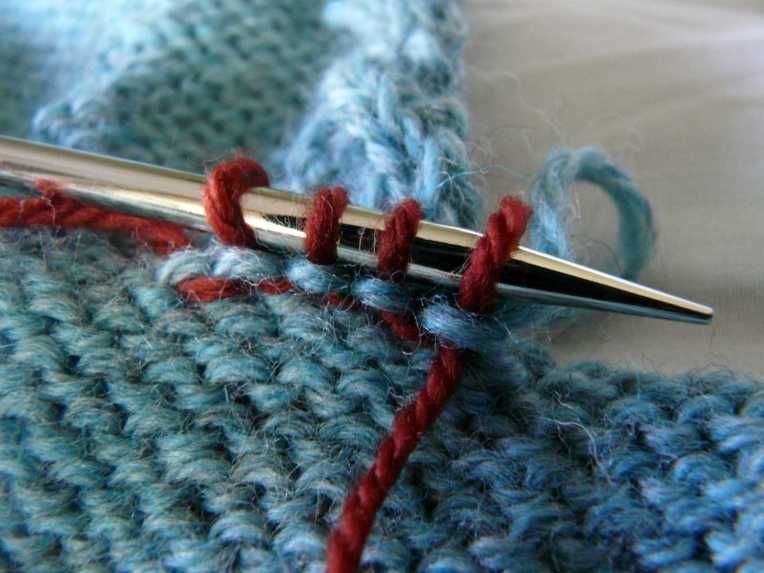
Suppose you were using the stockinette side as your RS and the reverse stockinette as your WS, as usual. On the WS, locate the row of purl bumps just below the live stitches of the Back. Follow that row into the LF, then pick up loops through those bumps:

08 PUAK

Work across the live stitches of the Back:

09 Cont Working

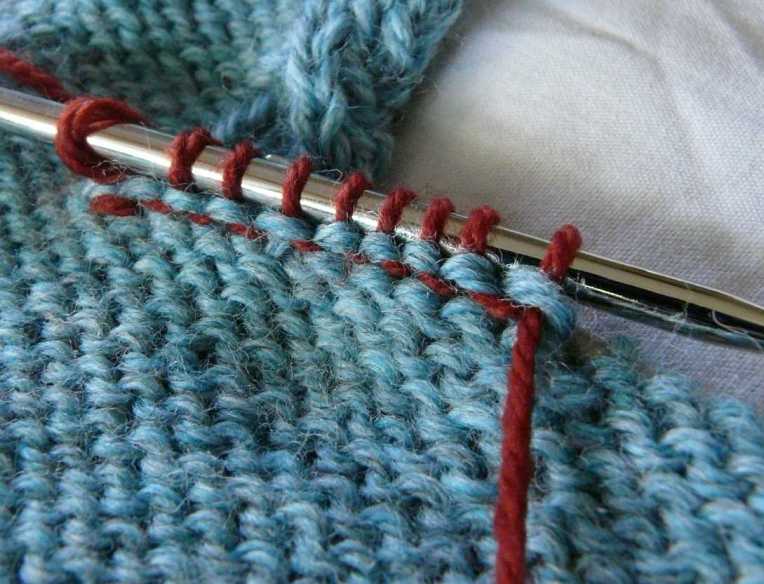
… And then pick up stitches from the RF.  The photo demonstrates with red yarn for clarity; you would use your project yarn.

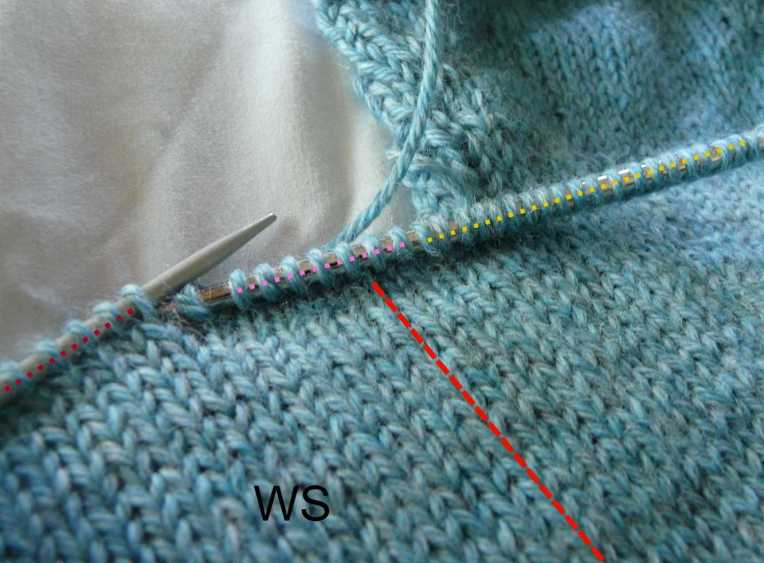
However, the reverse stockinette side is my right side, so I certainly cannot pick up the lining there! Instead, I cast on stitches for the first lining, knit across live stitches, then cast on stitches for the other lining. Yellow dots are cast on stitches for right pocket lining, pink dots are stitches worked across held Back stitches, red dots are remaining Back stitches waiting to be worked. After those are done, I would cast on more stitches for the left pocket lining. The cast on edge will be sewed down later.

10 Lining and back

b) Number of stitches: the number of stitches to be picked up or cast on should normally be as wide you want the pocket lining to be. However, if you’re not sure you have enough yarn, or you’re using really bulky yarn, you can pick up or cast on about an inch worth of stitches and work rest of the lining later.

 Let’s call the number of stitches you cast on, or picked up, Y. 

13. Work for X+2 rows, not forgetting any shaping, ending with a WS row. Cut the yarn.

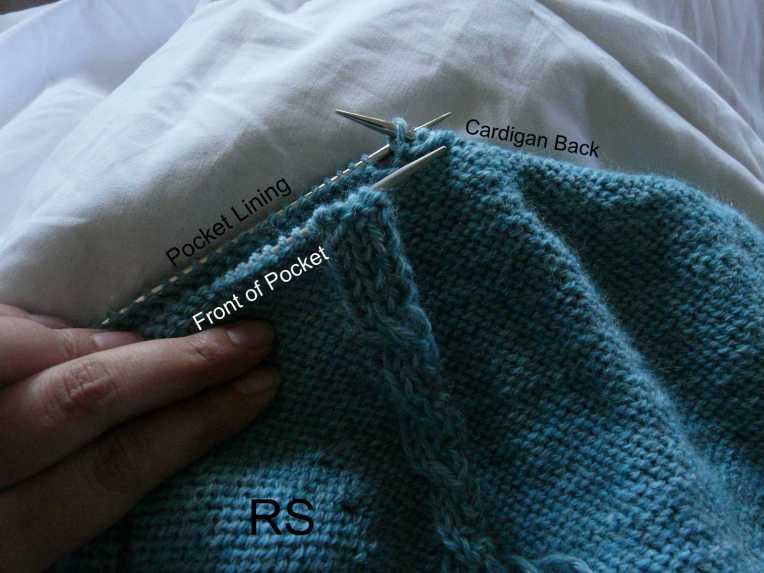
14. Join everything together: Using the attached yarn from Step 7, work across the LF till Y stitches are left. Hold the lining stitches behind the remaining LF stitches…

11 First pocket ending

… and work two stitches together, one from each needle, to join.

12 First Pocket done

Continue till LF stitches are over. Work across back till Y stitches are left. Holding the lining behind the RF, work two together, one from each needle, till back stitches are over:

13 Second pocket ending

 Continue working remaining RF stitches.

15. Work the rest of the cardigan as in pattern.

16. To finish, sew up all open edges along the pocket linings. If you chose to work linings for only an inch (like the second option in Step 12.b), first pick up stitches along the vertical edge of the lining with a thinner yarn, work the rest of the lining, then sew everything down. It should look like this:

pkt-back

That’s from a sweater, where I cast on about an inch of stitches for the linings in the main yarn (purple). After knitting the sweater, I used a thinner yarn (grey) to pick up stitches along the vertical edge of the lining, worked the rest of the lining, and sewed everything down.

 And there you have it: lovely inseam pockets!

Koukla

And here’s Koukla:

Koukla 1

A pattern photograph can sometimes strike so strongly that you have to have that sweater in that colour. I loved Koukla so much when I bought Brave New Knits in 2010 – in fact, it was the pattern which tilted my decision in favour of buying the book – that I couldn’t imagine it in any other colour when it came to knitting it.

As written, however, it could have gone rather wrong on me, with its high-necked tiny-sleeved baby-dollness. I knew I’d have to make the scoop-neck deeper, the sleeves perhaps longer, the ‘skirt’ definitely longer and more gradually shaped.

I used Custom Fit to create a high-waisted body measurement profile, and generated a scoop-neck, double-breasted, bottom-up cardigan. Then I tweaked the first pattern iteration to make a more obvious indent at the empire waistline. Following the original pattern, I cast on the Custom Fit waist measurements and finished the bodice, then picked up stitches for the skirt and knitted it downwards, reversing Custom Fit instructions (ie, increasing where it asked me to decrease). I picked the sleeves up around the armhole and worked them top down.

This pattern has lots of polished touches: vertical hem, inseam pockets made as you go, and turned hems. A pretty, wearable and staple sweater.

Koukla 2

Details
Pattern: Koukla from Brave New Knits
Yarn: Cascade 220; 100% wool; 201m =100g; worsted weight; “Lavender Heather”; every bit of 5 skeins.
Needles: 4mm for everything, 3.5mm for picking up sts around the armhole.

Roses and Welts

I made another skirt, a much better fitting one than the last two. It’s a basic a-line skirt from Sew U, but I made tons of changes. First, I left out the front darts to accommodate my tummy.  Then, I reduced the length substantially, and also lopped off about an inch from the top. I still marvel at the amount of ease built into the Sew U patterns – 4 inches of width removed from the bottom, and the skirt is still a-line. Finally, I added a hook and eye closure.

Oh but that’s not all! The skirt also has:

A lining: this rather bilious green fabric was what I had lying around. I used it since it’s going to be invisible anyway, and I love the heavy swishy drape and structure that a lining gives to garments. It feels like a Solid, Well Made Thing.

Piped Welt Pockets: Tutorial from here. They were much easier than expected. My only problem was: the zip foot, which came with my Brother LS2125. It has a very broad, wide, ‘heel’, which prevents the stitching line from snugging up to the piping. Well, that’s an understatement. It is inhumanly determined to not stitch next to the piping, and with grim persistence pushes the piping away no matter what you try (why yes, I did have to spend a lot of time re-doing the piping). So the curves of the pocket opening aren’t as perfect as they could be. While I’m all for making do with what one has — and not spending on extra gadgets — I think I really do need a foot that forms a stitching line along its edge. See, other people agree with me!

Three rows of top stitching, to prevent the lining from riding up.

Matched with similar, subtle, top stitching at the hem.

And now, my position on a couple of controversies:

Quilting cotton: Yes, this is quilting weight cotton. I would never make a dress or shirt out of it, but its stiffness is good for an a-line skirt. The lining helps make it comfortable too.

Lining hem: ok, this is a controversy only in my own mind. Should the lining hem be turned out (between the lining and the main fabric) or in (next to the body)? I’ve seen RTW examples of both styles. My reasoning is, that while all construction details (darts, seams) should fall between the lining and the main fabric (so that there is a smooth, neat surface if the garment is turned inside out) the hem is the only part of the lining most likely to be seen when worn. Therefore, it makes sense to turn it inwards (towards the body) so that it looks clean if the main fabric rides up while worn.

Meanwhile, Nanook still awaits pocket linings. But I did so much successful sewing this weekend, I didn’t have time to knit.

Day Ten: Braided Pullover

And so ends, happily, the Adventure of the Wandering Braid.

Pattern: Braided Pullover

Sweater Yarn: Filatura di Crosa Zara Plus, 774m, No.1706; 100% superwash wool. An aran weight yarn, knitted firmly in worsted weight. Blocking smoothed out the tension of knitting, and gave it a velvety, smooth drape.

Pocket Lining Yarn: Filatura di Crosa Zarina, tiny amount, No.1481.

Needles: 4mm for body ribbing; 4.5mm for body, and for sleeve ribbing; 5mm for sleeve; 3mm for pocket lining. The reasons for my peculiar needle choice explained here… sadly, it did not work as intended, and I had to buy another skein.

Final Thoughts:
Although this took more than 10 days, I’m consoling myself with the fact it took, actually, 10 knitting days.

I’m pretty happy with the result, although I might pick up and lengthen the sleeve cuffs later. The braid lies exactly as I wanted it to: a trompe l’oeil  of a wrap top. I’m really happy that I decided to do the chest section of the braid separately – otherwise, the sharp change in angle combined with bush shaping was creating horrid bumps and warping.

I decided to restrict the pocket size to the width of the braid (which gets stretched slightly when worn), so as not to have any puckering in the stockinette section – over the tummy, no less! – where I sewed it down.

The pocket is held closed with light- weight plastic snaps; I added these pretty buttons along the braid to continue the illusion of its being a wrap top.

I’m happy with the back shaping too! It makes all that calculating and measuring worthwhile.

Overall, I think it’s a good looking and mostly practical pullover. I wish the sleeves were longer because when I face winter, I face 10 deg C without heating, and have to rely on my mammalian evolutionary ancestry to keep warm. But then again, I wouldn’t be facing winter without the defence of a long sleeved layer inside, so perhaps this pullover can stay bracelet length.

The most impractical yet beloved component of my sweater is the tiny pocket – what on earth can I keep in it??! A microfilm with the plans of the new submarine?? Do spies even use microfilm nowadays, or have I been reading too many Agatha Christies? Never mind, it’ll hold a scrap of tissue paper if I get a runny nose.

Day Nine: Finish Line in Sight

Yikes! Has it really been a week since my last post? Sadly, my knitting time got sucked into a Real Life black hole.

But look at what’s emerged from the other side:

  • Complete and blocked body (except for half a neckband).
  • Complete and blocked sleeve.
  • A second sleeve that has just finished being blocked.

Does this look awfully like the last post? Don’t forget, the this is what the black hole did to the sleeve:

Sadly, the black hole also ate some yarn so I will have to buy another skein to complete the neckband. But now, the finish is near!