Side Ruched Top

Here’s the second top I made using the sloper developed from a Craftsy class.

p1100192

I wrote previously what  a great moulage and sloper I derived from it, and my first garment. I used the same four classes:

1. The Bodice Sloper
2. Creative Darts and Seamlines
3. Creative Necklines
4. Creative Sleeves

Also, it’s amazing how Craftsy drops class prices to such fabulously low levels every few months!

It is a lightweight cotton (I think from one of the giant fabric shops in Nehru Place, New Delhi). I rotated the shoulder, half armscye and side dart into the waist dart, but didn’t use the waist dart since I have a tummy and don’t like to be fitted in that area. Then I split open the (unused) waist dart, and inserted wedges in the outer leg so that it could be gathered back to fit the central leg. I’m a bit bummed that the gathering is kind of invisible in this print, but at least I know it works!

p1100199

I also curved out the bottom to look more like a shirt hem. Also, since I didn’t want to bother with openings, I added 1/4 inch to each side (adding 1 inch ease overall) at the narrowest part of the waist so I can pull it over my head. Without closures, it feels a little snug to pull on, but once on the body correctly, it fits beautifully.

On the back I kept both, the shoulder dart and the waist darts, and extended the shoulder by 1/16 inch, easing it to fit the front shoulder. This provides a nice fit through the torso as well as leaving room for arm movement in a sleeved garment. Because this is a little more fitted than the previous one, I had to account for the horizontal waist shaping dart on both back and front. Since there is no waist seam, I compensated it at the neckline (the class explains how to do that).

The sleeves are short, almost cap sleeves, with gathering at the head to echo the side gathers and scooped at the bottom. Instructions on how to make them from here. I probably should have done facings, but loathe them, so simply added bias facing at the neck.

Now really, look at the fit on this one! I’m kind of stunned I made this, having been used to typical RTW fit, and lack of arm movement for so long! Even though it is a very simple top, it fits so beautifully! The only things I would change next time would be not to add a puff (in addition to the gathering) on top of the sleeve cap. And I should remember to centre prints.

Verdict: very happy! I think I’m actually gaining more confidence to use good fabrics from now on.


Scalloped Tunic

Here’s the first proper garment, made from my sloper! I used lessons from four Craftsy classes for this one:

1. The Bodice Sloper
2. Creative Darts and Seamlines
3. Creative Necklines
4. Creative Sleeves

p1100182

They are all by the super competent Suzy Furrer, and I’m pretty sure I got at least three of them at a 75% discount and one of them at a 50% discount. Excellent value for money!

The fabric is a thin summer cotton (probably from Nehru Place, New Delhi) and I followed  these instructions for the scallops. Seriously, the easiest scallops ever, without needing a million clips before turning.

In design choices, I rotated shoulder, half armscye and bust darts into a diagonal centre front dart (it’s a little invisible in this print, but you may be able to see an inverted V hanging off the neck at the centre front). I didn’t use the waist dart at all. It is fitted till just below the high figure point and then swings out. I calculated how much to add via insertions by seeing how wide the bottom needed to be, to fit in a whole number of scallops on the front and back. I think I went a little overboard though, and will take out two scallops from the whole circumference to recover it from maternity top territory. Luckily, this will be an easy adjustment, just a matter of bringing in side seams at the hem and blending to the existing seam at bust level.

The back has a shoulder dart (because it is sleeved), and the shoulder itself is extended by 1/16 inch and then eased to fit the front, to provide more room for movement in a sleeved garment. I omitted all other darts, and ignored the horizontal waist shaping on both front and back. I didn’t even compensate for ignoring it at the neckline, since it is a loose-fitting garment.

Guys, I am super pleased with this! I am planning to make a series of very simple tops, trying out a couple of new techniques in each. Nothing spectacular, but good enough to lounge at home or walk the dog. I kept this one deliberately loose at the bottom so I wouldn’t have to bother with closures, but it is intended to be well fitted from the full bust upwards. And it is! And look at that sleeve — it is the first draft, calculated off my garment sloper, but no drag lines! I think the sleeve cap could stand to be s-l-i-g-h-t-l-y less puffy, but that is the only fault I can find with it. Everything is well fitted, and yet arm movement is easy. I’m hooked!

I’m planning to make a few of these casual things to perfect the fit, trying new shaping methods and sleeves, before venturing into my expensive fabrics. For my next top, I’m going to keep the waist more fitted.

Verdict: very happy with this nice little tunic!

Breaking the Mould

I’ve been a busy little bee, sewing up a moulage for myself. And it worked!

Longtime readers may recall that ages ago, frustrated with sizing in commercial sewing patterns, I had applied the principles of knitting to sewing — draft a Back and do an FBA to get the Front. This actually worked surprisingly well, and I used this pattern to make quite a few pretty things.

But it was never quite right. Woven fabric behaves differently from hand knits, and there was always a little gaping here, a couple of diagonal drag lines there, some falling shoulder seams too, meaning the garments looked nice, but not stellar like some of my best hand knits (yes, modesty isn’t really my thing).

So finally I took a class on Craftsy, The Bodice Sloper, to draft my own sloper. People, it is a fabulous class, well worth the full price (and even better if you get it at a super discount like I did). The instructor, Suzy Furrer is very clear, articulate and competent, and the lessons are full of little nuggets of information: did you know, the front neck is 1/8 inches larger than the back to prevent gaping and pulling? And that if you’re over a C cup you should fold out half your armscye dart in a sleeved garment to have ease for sleeves and yet create additional cupping? That there is even a horizontal dart-like ‘waist shaping’ which needs to be dealt with to avoid wrinkling in the torso? That there are actually two points on the front, from which darts can radiate? I certainly didn’t, and I am so grateful I took this class.

You start off by measuring yourself and drafting a moulage which is a skin tight mould of the body in woven fabric. The theory is that once you draft a perfect moulage, you can then add ease to it to create a sloper, which is a basic template of a garment. So why not start with a sloper? Because the ease built into it will not allow you to correct fit problems. But by starting with a body mould (the moulage), you know that whatever slopers you create off it (with small positive ease for blouses, greater positive ease for jackets and coats, negative ease for knits) will fit exactly as intended.

I admit to having my reservations — I wondered if I should measure my front and back circumferences separately. But I followed instructions exactly, and yeah it all worked out! The only place where I went off script was to follow the instructor’s answer in reply to a question from a body type similar to mine. It was a minor adjustment to the side seam length, but it was necessary to get a good curve at the armhole.

Once my moulage was perfect (only took two tries, and the process was quick and exasperation-free), I drafted up a blouse sloper. What freedom that no further fitting was needed!

Here’s the Creature critically inspecting the moulage…

20160719_131814

I’ve already made a couple of blouses from the sloper, one sleeveless and the other with sleeves (which requires a further, small modification to the sloper), and will be posting about them soon.

Now, finally, I’m going to reanimate my plans for a Cambie and Parfait. I had dreaded the amount of adjustments required, but now I can just copy the style lines and draft to exactly my own shape!


L, Not-So-B, D

Another Muse Natalie. I love this pattern!

P1100141

I confess to being the sort of person who hates those “10 Things a Woman Must Have” type lists. Although I love looking at pictures of capsule wardrobes for a specific reason (winter business travel, summer beach, etc), the idea that all women, in their daily lives, have to have a certain set of clothes really annoys me. And especially when these typical lists are so soul-suckingly boring (LBD, white button down, striped T-shirt, blah blah blah).

So if I have to sew a D, it cannot be fully B, and, as it turned out, it’s not so very L either.

I increased the length of the centre front skirt so as to keep the hem straight, but made no other changes. The centre triangle is basted to a woven material (not interfaced) for stiffness. And I hand-sewed on a matching triangle on the WS to hide all the seams. I also had to hand stitch the neck binding on the reverse side after attaching it by machine. Any attempt to machine stitch the binding to the WS resulted in a horribly wavy neckline. Probably because my jersey fabric was so thin!

P1100145

Nothing more to say — I like it as much as my  first one, despite obligatory photobombing by the Creature!

And just for fun, here’s how much the Creature has grown in the five months since I sewed my first Muse Natalie:

P1100154        Puppy 01

Oh dear, he looks quite tubby and stubby in this photo! It’s because his body is squished against mine, pressing it flatter and making it look larger.

And now, I sound like one of those dog parents! But he’s not tubby and stubby, I promise you! Here’s proof:

P1100127

Wren in Navy

P1100101

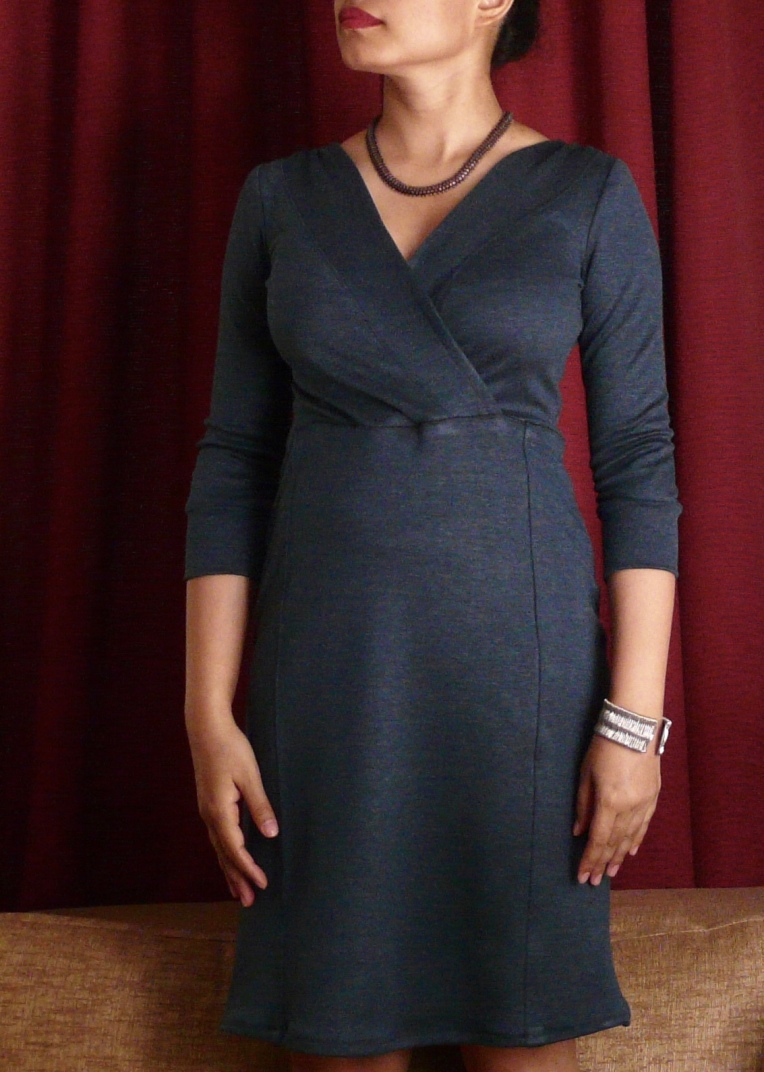
Colette Wren — DONE!

I haven’t made any Colette pattern since the Dahlia a couple of years ago, because the rather simple stuff they put out since then didn’t inspire me. But Wren, yeah!

Of course I decided upon the version with the panelled skirt. I did have to make some important changes to get the kind of fit I like. That said, there are some issues with the drafting of this pattern, so take note!

Size
Looking at the sizing guide, my bust size put me in XS. But the finished garment measurement on that would give me negative ease of 4 inches! Eep! I know a little bit of negative ease on knits is good, but 4 inches?? I became thoughtful.

Because of my thick waist, I decided to grade up to S in that area. But the finished measurement on that would still give me some negative ease. I became really, really, thoughtful.

Finally, my hips put me back in XS. But the finished garment would still give negative ease of 4 inches! Never! Negative ease in a clingy garment which extends below the hips means butt cupping and pelvic cling and all sorts of other maladies out of the fitting dictionary. I wasn’t going to let myself in for any of that.

Fortunately, I’d sewn my Muse Natalie a few weeks ago, and the ease on that was perfect. Mildly negative in the bust and mildly positive in the waist and hips. So I knew I was on the right track and felt very confident in choosing to go up to M at the hip notch. I did, however, go down to XS again by the hem, to get that shapely look the garment was trying to achieve.

I’m not sure why the pattern has so much negative ease throughout. Perhaps it’s a way of getting the garment to ‘fit’, but to me that seems like lazy drafting. Knits can be shaped, albeit not with darts, and should be, instead of just relying on the stretchiness of the fabric.

Pattern Changes
Back: XS at shoulders and underarm, graded to S at waist. So many reviewers complained that the armscyes were too loose that I simply drew in a smaller one from my Muse Natalie pattern.

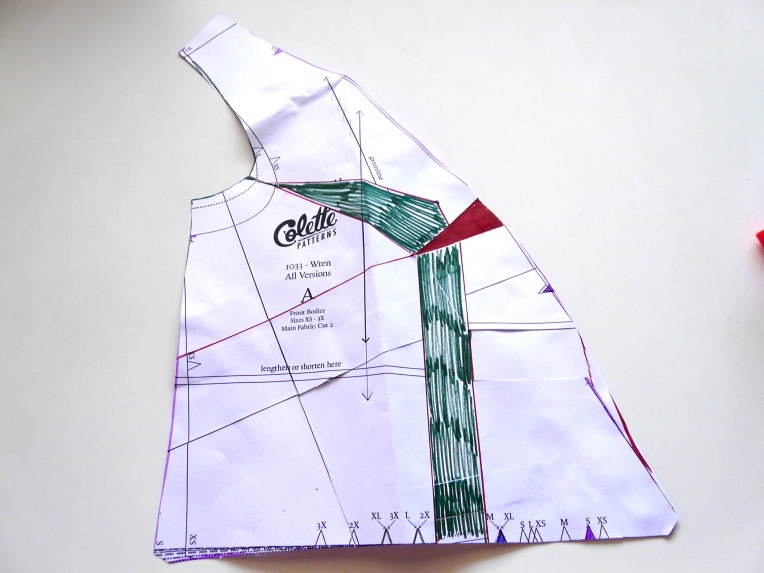
Front: XS at shoulders and underarm, graded to S at waist. I also did an FBA of one inch, so that I gained 2 inches across the whole front and so kept the negative ease of the finished garment to 2 inches (original 4 minus 2 added via FBA). I didn’t remove the extra width added to the waist by the FBA, since I need ease for my tummy. Now, to do the FBA, I had to open a side dart. This I rotated close and moved the excess fabric to the front edge. In the picture below, the green area is the extra width added through my FBA, and the red wedge is the extra fabric in the neckline.

P1100050

Instead of hemming the neck as suggested, I cut a long strip, reduced it by 10%, and used that as a continuous facing all around the neck once the shoulders were sewn.

Also changed the armscyes to Muse Natalie.

Sleeves: Used from the Natalie pattern, with an added cuff.

Back Skirt: S at waist, graded to M at hip and back to XS at hem.

Front Skirt: Ditto above. However, I also filled in the shaping at the top of the skirt panels to make them fit the extra width on the front added via the FBA. In the picture, these extra filled in bits are in red and maroon, and match the green FBA width above them.

P1100052

Sewing
After all that, the sewing was fairly simple. I did all seams with a zig-zag stitch and didn’t need to finish any edge since the fabric was so stable. I also twin-needle top-stitched almost every seam, and love the crisp look!

P1100067

Fabric
Quite a thick, luxurious navy with thin metallic accents. One way stretch only.

Verdict
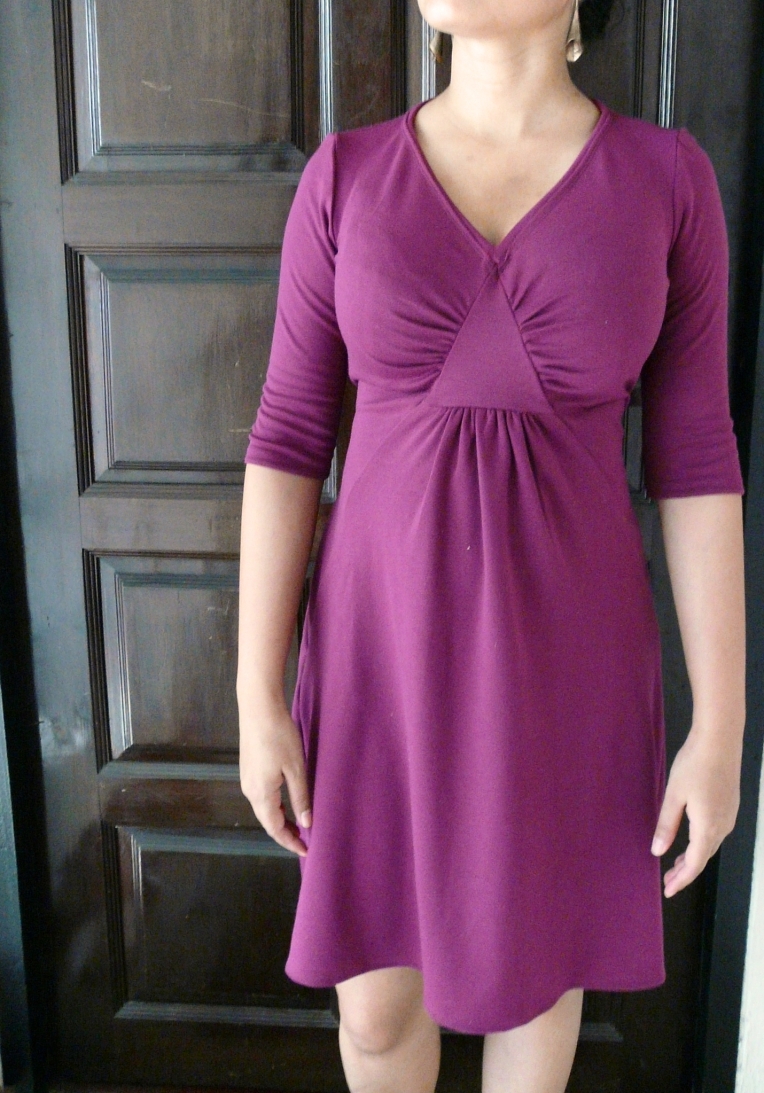
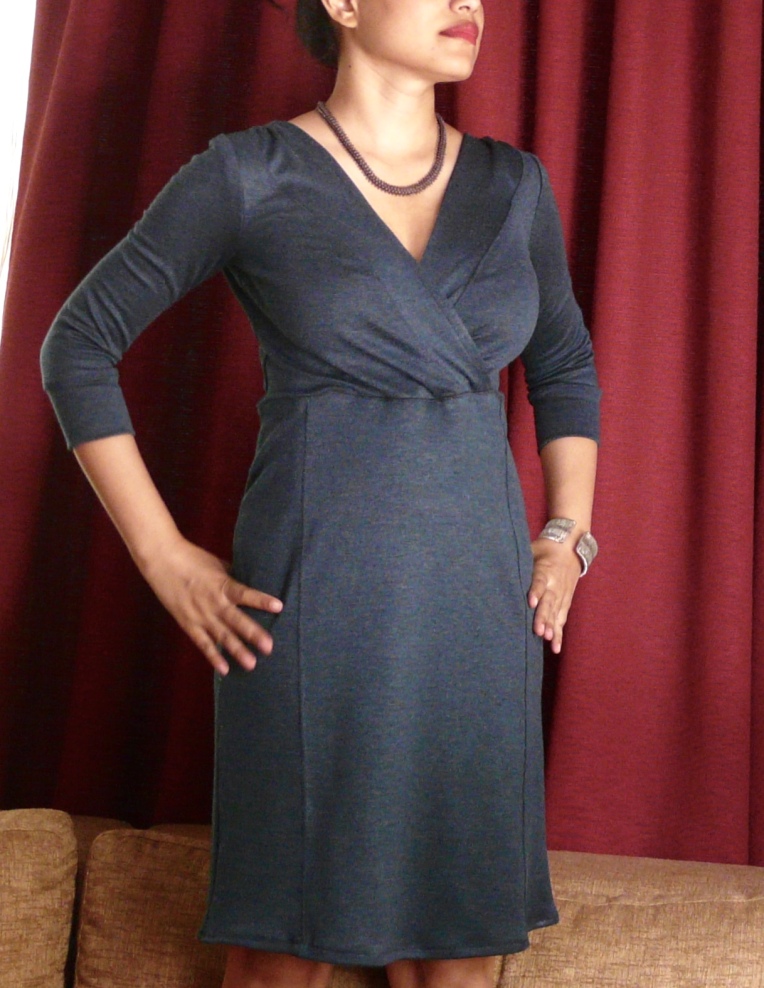
I really like this garment, especially with my changes. I can’t imagine how clingy it would have been without grading up through the body! However, there are a few things I would definitely change the next time

  • Remove a one-inch-tapered-to nothing wedge from the CB
  • Bring in shoulders for a narrower neck on the back
  • Ditto on the front, continuing the extra fabric all the way to the waist for more coverage.
  • Full bicep adjustment on the Muse Natalie sleeve

If you intend buying this pattern, do be aware that most reviewers have noted problems. The sleeves are very wide and low and practically everybody has had to modify or substitute. The waist is pretty high; I like that, but it’s something to note if you want the dress to hit at your natural waist. The neck finishing is a bit amateurish, and many others have added a facing instead of simply turning it down. And the (in my opinion) excessive negative ease throughout the body is a bit disconcerting.

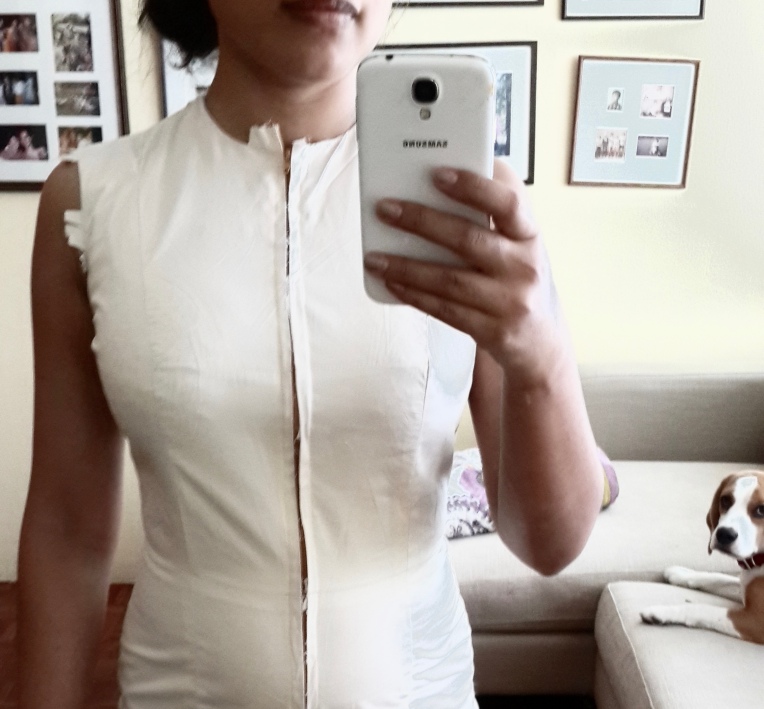
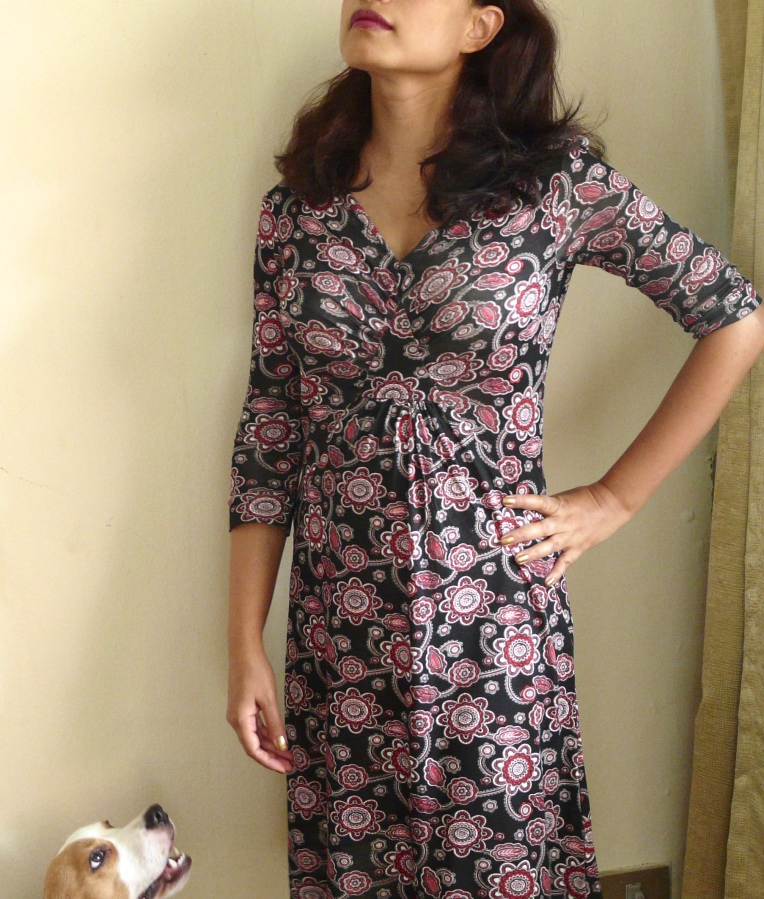
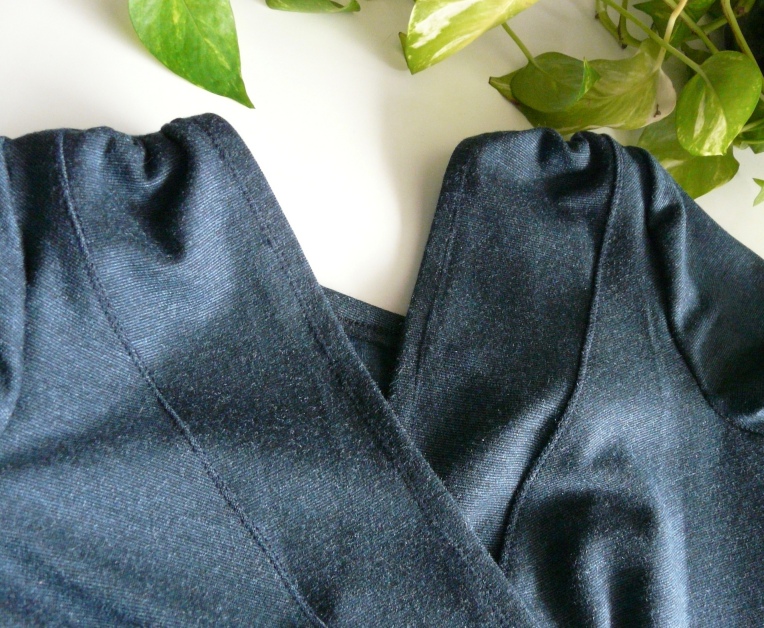
Finally, there are two great eyesores about this dress. First, the wonky hem — this is my inexperience with sewing knits. I’m hoping washing and pressing will sort that out. Second, the hideous, undulating waistline. This is very, very obvious since it’s on the front, and seems to be  a problem in every Wren I’ve seen, caused by the neckbands being kept short to prevent gaping. You can see how the waist rises along the sections where the neckbands are attached.

This means that the Wren pretty much always has to be worn with a belt. I’m thinking of drafting a self belt and incorporating that into the side seam the next time I make it.

Now I don’t mind making adjustments for fit, and certainly don’t expect pattern companies to draft to my specific body shape. Some narrowing and widening to fit my unique body is certainly expected. But I do expect companies charging premium price to ensure that the basic draft is good.

P1100104

Score
7/10. Three points deducted for the undulating waistline, which should have been fixed as a design drafting error! And also for the gigantic original sleeves. But apart from that… I like the pattern and already planning other versions; perhaps one in a thin, copper coloured knit with flutter sleeves? How tantalizing!

Shameless Product Association

About a month ago, I had thought I’d left my knitting mojo loss behind. I was going to cut, knit, sew, create! A million, million things before the year ended!

Oh dear. We got a dog. And then came a month of full on utter exhaustion. I now know what new mothers feel like, except I’d like to point out that newborn humans cannot walk and run and chew everything. What’s that you say? Human babies have opposable thumbs and can get into even more trouble? Time to throw down my trump card: human babies can be diapered.

Anyway, the brat did take a nap or two:

20151208_084255

During which I managed to cut and sew myself a Muse Natalie dress.

01 Front

I cannot say enough good things about this pattern. The instructions were clear, the result is flattering and I love the fact that level of ease built into each part of the pattern was just right for knits: mildly negative for the bust area, barely positive for the waist and a little more positive in the hips. It hugs the body in all the right places and gently skims over where you don’t want  any cling.

I cut the second size throughout and only faked an FBA by cutting the front piece in the third size in the bust area and grading down to a size lower by the time it reached the hips. Instead of interfacing the centre triangle, I basted it to a piece of woven fabric cut the same shape. With no access to a serger, I sewed seams with a narrow zigzag and finished raw edges (though they didn’t really need it) with a wider zigzag. Everything looks fine from a distance; close up some seams are a bit wonky, but since this is my first proper knit garment I’m not beating myself up!

Next time (oh yes, there will be one) I’ll make the following changes:

  1. Add a little more length to the front skirt, in the centre only — it rides slightly high now.
  2. Make sleeve caps a little less tall, since they seem to poke up a little.
  3. Leave out the waist ties, don’t really need them.
  4. Cut 3/4 sleeves longer than the given pattern length, or add cuffs.
  5. Cut the overall length at the given dress length so I can fold up a more substantial length; I cut this one about 3″ shorter and it is a bit too short now.

As promised in the title of this post, a shameless attempt to make my dress look even cuter through product association:

Puppy 01

(Yeah, he’s always blurry. And already I’m thinking: He’s grown!! Where’s the toddly little thing I had last month?)

This is the back (with obligatory photobombing by the creature):

Back 01

The fabric is a nice stable-ish cotton jersey and I love that I now have a great, basic, neutral dress! I know bright magenta doesn’t read as ‘neutral’ to most people, but in the context of my wardrobe I’ve decided to define neutrals as ‘serving as background to show off my handknits and jewellery’.  And that’s it, really!

02 full

Victorious

During my no knitting phase, I tried to sew, but everything turned out wrong. I’ve since worked out fixes and will eventually post them, but it was disheartening that I’m still not sure enough of sewing to bend real materials fully to my will; it was frustrating to think processes through meticulously and yet get unpredictable results simply because I didn’t know every factor of that universe.

Finally, I picked up an old dormant project. I had used a pretty cream and brown linen, underlined with burnt orange rayon to start a dress over a year ago. Then I attached a creamy lace trim at the neck, tried it on incomplete, hated it because it looked so matronly, and promptly stuffed it into a project bag.

A few weeks ago I took it out, broadened and deepened the neckline and attached thick piping instead. Voila! I auditioned the previously cut sleeves, found them too matronly and decent, then cut them shorter and scooped high (is that the correct term?). I finished their hems with applied bias tape of the same material, leaving them unlined. Double Voila!

front

Finally I made the horizontal pleats at the bottom. They had always been in the plan and I’d left the fabric long at the bottom. I’m so glad I planned them, they add weight and make the dress swingy and fluid. Triple Voila!

The dress is based off my ancient, much modified, sloper which was the basis for several tops. To turn it into a dress I just extended the hip lines straight down. The underlining really helps to give substance, drape and smoothness to the otherwise crisp and fine linen. And now it’s morphed from matronly to actually being a little too short for work – I’ll probably need some sort of leg covering to wear this at stuffy meetings. But yay for a sewing victory!

Pink Worms and White Flowers

Over the weekend my beautiful Burrard pullover turned into a pile of worms…

photo1441502594175

Which had a good swim, and then relaxed overnight in a cool breeze. I had a gauge issue with my first iteration of the sleeves and back and had to redo them; but even after that the whole sweater still turned out too small.

Or rather, it was a close fit. Now I love snug fitting sweaters in thin yarn, they’re great layering pieces. But equally, I loathe thick, woolly, cabley stuff that fits like a sausage casing. This was a sweater that shrank in length every time I pulled it over my body, one whose sleeves rode up and exposed wrists to the cold, one which wouldn’t allow me to wear an insulating layer inside. And I guess I’m too much of a product knitter to keep a winter sweater that couldn’t be worn in winter. If it’s cold enough to wear a cabled, long-sleeved sweater, it’s cold enough to need a thin layer or two inside! I thought of giving it away, but realised I love the colour and pattern too much to abandon the project – I will knit it again. 

This time I’m using stitch counts from my Dusseldorf pullover, which fits just as I want a thick, cabley sweater to do. Third time lucky? Fingers crossed!

But look: a new needle roll!

needle roll

I used this pattern and leftover fabric from this blouse. While some of my needles are occupied with other projects, these are, basically, all the needles I own. I built them up carefully, buying sizes I use most often, and I love the clean and spare functionality of a curated needle collection!

Pink Gold Print

I have great envy of people who can come up with snappy names for their projects. I’m just too literal minded… sigh! Therefore, I present: Pink-print-diagonal-empire-top, known as PPDEP to her intimates, for your viewing pleasure.

Front

I’m quite happy with this one, since I managed to get the diagonal empire waist (is there a technical term for this?) at exactly the right height. After some futzing around (through previous, unblogged, very unflattering projects), I’ve discovered the most flattering empire line for me is slightly above the underbust. Otherwise, at the exact underbust level, it looks just too Roman-Matron-Off-To-The-Gladiator-Pits-For-Elegant-Afternoon-Entertainment on me.

PPDEP is also based on the heavily, heavily, tweaked Sew U block. I chopped out the diagonal waistband and cut four pieces out of that piece (two mirrored sets). One for the outside, one for the inside. The ‘skirt’ of the front was cut along the fold, and darts from the original block retained. The front bodice required a bit more thought. I rotated the side dart out into gathers towards the bottom. Then cut a gently curving V neck. And finally, added button bands. The buttonbands and neck were finished with this tutorial (so brilliant!), just as in my navy flowers blouse. Then I overlapped the buttonbands, and sewed them to the diagonal empire waist-band. Pretty little wooden buttons:

buttons

The sleeves have a side split and are three-quarter length. PPDEP’s block is quite well fitted, so much to my disappointment I couldn’t quite pull on her over my head. Instead of subjecting her to violent tugging at each wear, I added an invisible zip at the side. So here we are, another nice little summer top! In rich glowing pink with gold block printing! It’s a regular soft cotton fabric, the sort that floods the local market every summer for people to snap up and run to the family tailor to update their summer wardrobe. I used less than 2m, but didn’t track the yardage exactly.

fabric

Also, this is probably my longest blogging break ever? I had this post written and uploaded, photos taken and filed; all I needed to do upload photos and publish. But the last 20 days have been mind-bogglingly busy for me (in very good ways) and so… no time to blog. I was even too tired to knit! What has everyone else been up to?