Pink Worms and White Flowers

Over the weekend my beautiful Burrard pullover turned into a pile of worms…

photo1441502594175

Which had a good swim, and then relaxed overnight in a cool breeze. I had a gauge issue with my first iteration of the sleeves and back and had to redo them; but even after that the whole sweater still turned out too small.

Or rather, it was a close fit. Now I love snug fitting sweaters in thin yarn, they’re great layering pieces. But equally, I loathe thick, woolly, cabley stuff that fits like a sausage casing. This was a sweater that shrank in length every time I pulled it over my body, one whose sleeves rode up and exposed wrists to the cold, one which wouldn’t allow me to wear an insulating layer inside. And I guess I’m too much of a product knitter to keep a winter sweater that couldn’t be worn in winter. If it’s cold enough to wear a cabled, long-sleeved sweater, it’s cold enough to need a thin layer or two inside! I thought of giving it away, but realised I love the colour and pattern too much to abandon the project – I will knit it again. 

This time I’m using stitch counts from my Dusseldorf pullover, which fits just as I want a thick, cabley sweater to do. Third time lucky? Fingers crossed!

But look: a new needle roll!

needle roll

I used this pattern and leftover fabric from this blouse. While some of my needles are occupied with other projects, these are, basically, all the needles I own. I built them up carefully, buying sizes I use most often, and I love the clean and spare functionality of a curated needle collection!

Bagging It

I made some project bags over a couple of days. So easy, so rectangular, so straight!

1. Small Project Bag

P1080039 P1080040

This actually is rather small and would be ideal for a sock or thin sweater. I love the way the drawstring is inserted; the hole in the lining left to turn the structure right side out is also the hole for the drawstring. Two clean lines of sewing finish the top and make the drawstring channel.

2. Yin Yang Bag

P1080041 P1080044

I got lazy with this and instead of eyelets and things, just made regular buttonholes. To accommodate them, I cut the drawstring in half, sewed each half to the outer bag before stitching it to the lining, then topstitched the upper edge closed. Then I passed each string through the buttonhole on its opposite flap, and joined the free ends of the strings with a flap of fabric.

3. Large Project Bag

P1080045 P1080046

Made with the same method as 1., but larger. Also, I wanted to practice the adorable reverse ‘window’ applique technique at the bottom of this page. I didn’t bother to handstitch the window since this was just a practice run, but love the effect and am planning mightier things.

None of these were made with very great forethought, and none are interfaced. This makes them very floppy, but they’re just to bundle my WIPs into, right? As for the projects themselves, artfully spilling out of the bags:

1. Long forgotten Bottoms Up: perhaps now I’ll be inspired to take it up now and then?
2. Opposite Pole: is done! Look for an FO post soon.
3. Boticelli Tunic: the body is done and I’m starting the sleeves and collar next.

Sew Ends 2013!

I managed a decent amount, although nowhere near the prolific levels of my knitting. And that’s because I was away from my machine for months at a time!

The undoubted star of my 2013 sewing has to be my Minoru! Here it is, centre stage:

Sewing collage 2013

Column 1: Paisley Back Wrap, Truly Myrtle Bag, Banana Republic Shirt
Column 2: Minoru!
Column 3: Truly Myrtle Bag, Navy and Lace dress, Laurel (unblogged)
Column 4: (Invisible, since unphotographable, since in another country): Two tunic length Laurel kurtis, sleeveless top.

In terms of usability, the two Truly Myrtle bags get used a lot, and the Paisley dress comes out quite often too. As do the sadly unavailable-for-photography kurtis  I made with the Laurel pattern because the original RTW pieces were too big to simply adjust for size. So I just laid the Laurel pattern over the giant sized RTW garments and cut out the pattern, positioning the embroidery flatteringly. The red/print Laurel hack (bottom right) is a bit too puffy at the empire waist and I may topstitch the pleats to move it into wearable rotation.

That’s all for the 2013 roundup! I was absolutely going to post this in December, but then spent the last 10 days touring a half excavated, once fabulously rich medieval city (Persian, Chinese and Italian travelers describe its markets filled with gold, diamonds and rubies; dancers with arms so laden with gold that they had to be supported by servants; sandalwood palaces and parties that went on for days); and then savouring Indo-French fusion food in the utterly charming maisons and villas of Pondicherry.

Thank you for reading, commenting, pinning and liking… you’ve made it worthwhile! I hope you all had a very happy start to the new year, and may 2014 bring you every happiness!

In Haste

I am knitting a Delysia:

delysia lace


I finished sewing another Truly Myrtle Box Bag:

02 - LavenderPink

I adore making this pattern. It’s neatly geometric and logical, produces a useful object, comes together with the precision of origami, has just the right level of complexity and ease, and – most of all – is made up of rectangles, unlike a !!^$^%$^ living body which has bumps and contours and undulations!

Having spent most of the last week fitting something around the said living body, I did manage to create something decent, but am too traumatized by the effort to talk about it now.

scallops

Soon!

Project Bag

There are these frightfully organised knitters, who keep everything to do with one project – yarn, needles, notions, pattern – in one bag. The bag is usually pretty (no discarded grocery bags!), with coordinating linings and pull tabs and handles. I wanna be a frightfully organised knitter too!

 P1050115

So I made this box bag using this tutorial. There’s really nothing more for me to add; the tutorial is very well written and detailed. There is one part where you have to cut out squares of fabric and lift the cut edges together – incomprehensible while reading, but makes perfect sense when the bag is in front of you. I didn’t interface because I didn’t have any. The main fabric is leftover material from my skirt, the lining from the buttonband backing of this cardigan.

 P1050116

Wait, did I say I had nothing more to add? Actually, I do have an embarrassing confession: up to now I had no idea what pull tabs were for! Of course I saw them everywhere (except garments) and the name itself is rather a big clue. Pull tab; pull tab; p.u.l.l.t.a.b… what on earth could it mean?

 P1050118

Until today, when, guided by some unkown force, I grabbed the zipper with one hand and the pull tab with the other, moved my hands apart and… got it!

New Obsession

Clearly, knitting was a gateway drug.

I started and finished a sleeve of the Giant Project in four days.

Blocked and unblocked

And then, took nearly a fortnight for the next sleeve because I bought a sewing machine!

In the last few days I’ve cranked out:

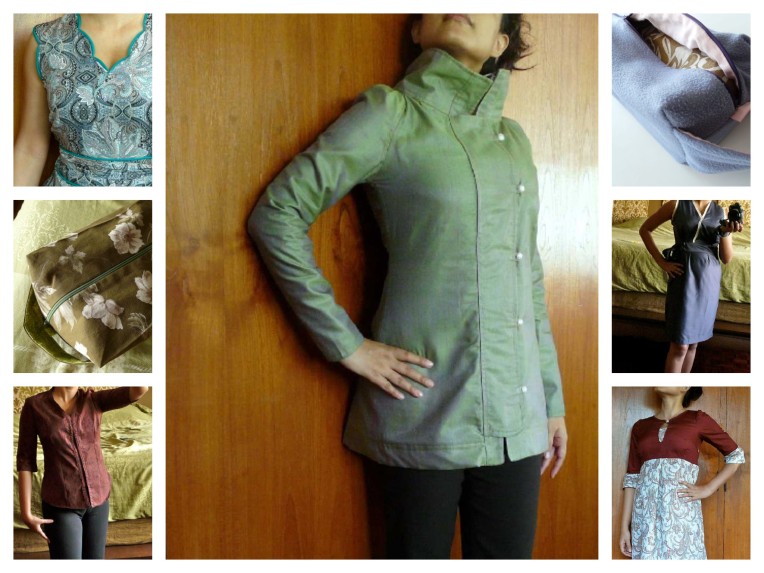
A bag to hold my sewing stuff. I’m glad I don’t have to sew bags for a living because that is the clumsiest thing I’ve seen (hence just the proof-of-existence shot, and no accompanying beauty shots).

A long boring rectangle to hide the edges of an ugly mattress.

A skirt! An actual living, breathing, adult garment! What a pity I cut out two Front pieces, which makes it really uncomfortable to wear! However it’s lined and zippered and all, so I’m sort of proud of myself. Might do another post later with all the gory details. Pattern from Sew U

A pair of shorts from Dozens of Ways to Repurpose Scarves. I’ll just use the picture from the book because there’s no way I’m pasting photos of my backside on the internet. It came out exactly as pictured.

How does sewing compare with knitting?

Pros

Fast: Even with all the excrutiating prepwork of cutting and pinning and fabric alignment, it is possible to make a (simple) garment a day.

Trousers: I might eventually gather courage to make myself trousers, which will liberate me from the tyranny of skinny tapering fashions in all the shops. I hate that shape! So unflattering. This was one of the biggest reasons why I wanted to buy a machine. Down with tapering pants!

Cons

Lack of Control: I’m so used to being able customise everything I knit, I feel vaguely degraded by how much I have to depend on patterns produced by others. It’s like going from being the oldest class in Junior School to the youngest in Senior School – you’re a silly, irrelevant, little thing all over again. Hopefully this stage won’t last long. This is an important factor for me, because I found myself much calmer while making the bag — there were no patterns to follow and notches to match.

Waste: as knitters we find ways to use up every last scrap of beautiful yarn, and it almost makes my skin crawl to see how much fabric goes waste even if you position pattern pieces ever so carefully. As a knitter I create fabric; but as a sewer – ummm that came out wrong; I mean, as a sewist – I discard so many scraps that, if they were dough, they could just be rolled out again to get at least five more biscuits. Thread must be wasted too. Before and after starting each line of stitching, I have to leave a 5” tail. I did try to be thrifty and leave 2” before starting, but that makes the thread jump out of the needle in the most annoying way.

Corrections: Using a seam ripper is ten times slower than frogging a knit.

Portability: No way to stuff the machine into a travel bag to work on while travelling.

Scheduling: There’s no way to finish a quick little seam or cut out a piece while waiting for a file to download. Each act of sewing is an Serious Undertaking needing preparation and set up.

Hmmm, five Cons vs. two Pros! Why, then, am I going to continue sewing? Did I mention it was fast…?