Or, how to make short-row top-down sleeve caps.
This is a genius method for people who hate setting in sleeves. I don’t, I rather enjoy it, but might switch to this one for sheer convenience! There are tutorials (written and video) on the internet, but I never found all the information I needed in a single place, so I’m adding mine … along with some bitter lessons learnt (BLL) and a rather wonkily drawn rainbow of rows.
Steps
1. Measure around your bicep. Ie, let your arm hang down vertically and measure a horizontal circle round your arm just below the underarm. Add your preferred ease to this measurement. Multiply by stitch gauge to get total number of stitches to pick up = T.
BLL: Do not be tempted to measure around the actual path of the armscye! Ie, do not measure up the shoulder, above the shoulder, down the shoulder and across the underarm. This measurement will incorporate the skeletal structure of the shoulder (a complex area of the anatomy if there ever was one!) and using this as your beginning measurement will give you a gigantic sleeve.
2. Measure the length of the horizontal BO at the bottom of the armscye and multiply by stitch gauge to convert its length to number of stitches = UA (underarm)
3. Calculate C (cap) = T – UA
4. Divide C, as evenly as you can, into six sections. If there is a remainder, distribute it among the ‘middle’ sections. Here’s my Dahlia example to explain what I mean:
a) T = 78
b) UA = 10
c) C = 78 – 10 = 68
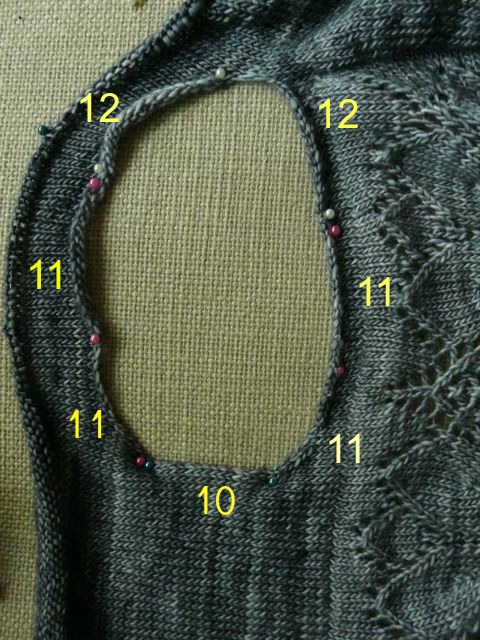
Dividing 68 by six I get [11, 11, 11, 11, 11, 11] and a remainder of 2.
So I’ll distribute the 2 stitches in the middle of the brackets to get: [11, 11, 12, 12, 11, 11]
This is all the calculating you need to do!
5. Pick up and knit stitches, using the numbers you calculated above. Specifically:
a) Pick up and knit UA stitches along the horizontal underarm BO (between blue pins)
b) Divide the rest of the armscye into six equal sections, using stitch markers or pins.
c) Pick up and knit C stitches from the rest of the armscye, distributing them as calculated in the brackets. In my example, I picked up 11 stitches between each pair of pink pins, and 12 stitches between each pair of white pins.
d) Knit one round, ending at underarm.
6. Start short rowing.
BLL: Do not over-think this and lie awake at night wondering why they are called short rows if each is longer than the previous, and if you’re doing something wrong. They are called short rows because you’re never knitting all the stitches around the armscye. But each individual row will be longer than the previous.
Note: I’m not going into the actual mechanics of creating a smooth, invisible turning point since there are so many methods out there. When I say “turn” in the following instructions, use your favourite method for creating a turning point. I love this one.
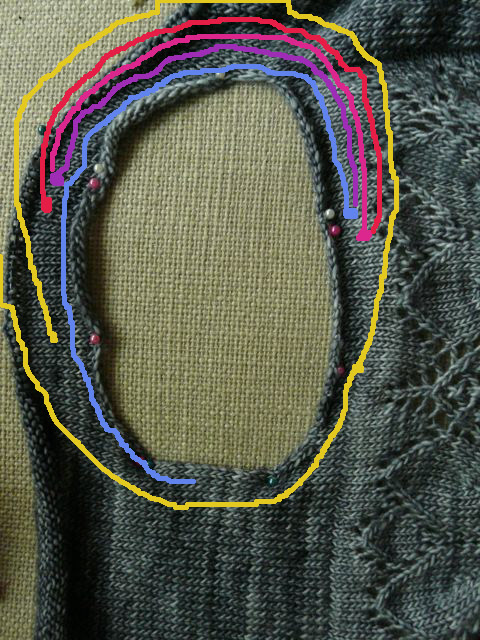
a) Work 2/3rds of the way round the armscye, to the end of the 4th section. Turn. (Blue line)
b) Work back to the end of the second section. Turn. (Purple line)
c) Work to previous turning point, incorporate wrap, turn at the next stitch. (Pink line)
d) Working to turning point, on the other side, incorporate wrap, turn at the next stitch. (Red line)
e) Continue in this way, increasing the size of the rows by one stitch each time, till you’ve created turning points at the ends of the 5th and 1st sections.
In the diagram, the lines indicating worked rows are concentric, to fit them onto a flat picture. In real life, they are stacked on top of each other, creating a perfectly shaped sleeve cap.
7. Start working full rows (Yellow line). Work in rounds and knit the rest of your sleeve. (Or, split at underarm and work the sleeve back and forth).
There are lots of variations on this technique – some will have you continue short rowing till the edges of the UA stitches are reached – but this one works for me. Experiment!


Love this! I’ve always had slight issues with my sleeves, but this is amazing! Definitely giving this a try. Thanks for sharing!
Thanks for posting your tutorial. I’ve used this to pick up and knit short cap sleeves, but I’m hesitant to use it on full length sleeves. My short cap sleeves don’t cover the full armscye.
My issue with this technique is that I don’t think you get the same look as a nicely tailored set in sleeve. Basically, you are casting on a circumference of stitches that matches your upper arm sleeve circumference, which can be quiet a bit smaller than the armscye circumference so you end up with stretched stitches around the armscye. The short rows give it the curved shaping at the top of the sleeve, but the number of stitches initially cast on is still too small for the hole. The construction of a true set-in sleeve is done such that the upper arm width can be very narrow but the slanted rise of the sleeve cap gives you a perimeter of sleeve cap that matches the armscye circumference, and maybe with a bit of ease. Also, the stitches in a set-in sleeve drop downward on the sleeve, but picking up the stitches makes the sleeve look more like a tube that comes out of the armscye.
That being said, I think there is a technique out there that involves picking up more stitches and then incorporating decreases along with the short rows.
Hi Betty,
I think the other method you’re referring to is described in Knitting Without Tears by Elizabeth Zimmerman, where she has you pick up a large number of stitches around the armscye, and then shape the curve the same way as a sock heel is turned — simultaneously short rowing and decreasing at the same time. I haven’t tried that one yet.
However, as to the short row method I described here (where you start out with a small number of stitches and only short-row to shape — no decreases — I have tried this out, and had no problems. In fact, many designers use this method and create beautifully fitted sleeve caps – check out:
1. Opposite pole http://jojiknits.blogspot.com/2011/08/opposite-pole.html
2. Leitmotif cardigan http://www.stolenstitches.com/2010/07/leitmotif-cardigan/
and many others. Hope you’ll give it a try… the caps do come out beautifully!
I’m knitting the Dahlia cardigan and have been musing about the lack of shoulder shaping since I’ve started. Thanks so much for making my job easier.
I’m now going to work out how to change the sleeve shape…
2. Measure the length of the horizontal BO at the bottom of the armscye and multiply by stitch gauge to convert its length to number of stitches = UA (underarm)
What does BO refer to, normally it meand bind off, but I am not sure what you mean, unless the length of the sleeve from the seam to the lower edge, Am I missing something?
Yes, BO does mean ‘bind off’.
In standard set in sleeve construction, a small number of stitches are bound off on the front and back pieces at the start of armscye shaping. These stitches are referred to as the “horizontal BO” in the instructions.
Hi — thank you so much for this. I posted you to http://www.knittingparadise.com, I was so impressed. If that sounds odd it is because KPers are nothing if not enthusiastic so I hesitate to have people’s site inundated with visitors. Sometimes there aren’t that many depending on the time of day, holidays, etc., but I’ve had more than 8,000 views of just some piddly little topic I posted, not even close to as helpful as this one. Stef
Me again …. I’m a little confused by this statement: “e) Continue in this way, increasing the size of the rows by one stitch each time, till you’ve created turning points at the ends of the 5th and 1st sections.” I numbered all the sections, not including the UA sts. So I have #1 at the lower left, #2 left center, etc., etc., ending with section #6 at the lower right & the UA sts in the center, between #1 & #6. Should it say “…ends of the 6th and 1st sections.” ?
I can’t believe I’m writing without knitting first, since I know how hard it is to describe knitting in words, but, I’m doing it anyway! I’m vewy, vewy confused.
Hello, the two points are between the 1st and 2nd sections (end of the 1st) and between the 5th and the 6th sections (end of the 5th).
Ah-HAH!!! Thanks.
Your necklace is more attractive than your sweater! Beautiful!